Thursday, February 14, 2013

Removing Mold From Bath, Grout & Caulking


Over time, mold and mildew build up on bathroom caulk, which can be a pain to remove. It’s not only a health hazard, it’s irritating.
There are different steps you can take to remove the mold. You can use the steps below to remove it overnight or you can start fresh and actually remove the old caulking and apply new. Those steps are further down the page.

Remove the mold but leave the caulking:

Often, you may notice that mold collects at the edge of the tub, like this:
It may because the caulking isn’t the right kind or water is left there for too long. Either way, you can remove the mold with these steps:

You will need:

Bleach
1 pair of Disposable Gloves
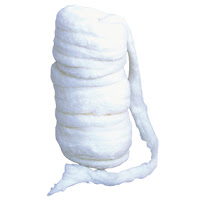
Paper Towels (or cotton coil – shown below, if you have it)

Steps:

1. Get a disposable aluminum pan or use something to pour the bleach in *avoid using plastics*. The goal here is to pour in the bleach so you can dip the paper towels in it.
2. Tear apart the paper towels and roll each one into what can only be described as a fruit roll-up (or cotton coil, shown on the right). This is so they sit on the mold easily. If you have cotton coil fine, I think paper towels work just as good.
3. Dip the paper towels in the bleach and lay them directly on the mold, pushing them into the crevices.
4. Let the paper towels sit on the mold overnight. Done!
You now have a clean, sparkly tub.
If the caulking is too far gone and it needs to be replaced, removing and replacing moldy or mildewed caulk is relatively simple. 
Keep in mind, though, that different types of caulk may be more or less appropriate for your project depending on your preferences for ease of application and removal, the substrate and the mold levels.


Start fresh! Remove the mold and the caulking:

There are different types of caulking, so let’s take a look.
Acrylic caulk is the best caulk for repelling mold and dirt. Acrylic caulk can be either water-based or siliconized, which allows you to choose the best application, substrate and durability preferences. All acrylic caulks have good adhesion, flexibility and lifespan, and are designed to not only repel mold but also to remain bright white over time. All-acrylic water-based caulks are especially versatile since they can be painted with many different types of paint. Keep in mind that acrylic caulks tends to be more expensive than other types of caulks.
We use Silicone-Based acrylic caulking and it works great.
Generally speaking, silicone-based caulks are the best caulks to use in mold-friendly environments like bathrooms. Since silicone is inorganic, it is extremely mold, mildew and water resistant. Additionally, silicone-based caulk is idea for substrates commonly found in bathrooms such as ceramic tile, porcelain and glass.
Follow this article for tips on removing the caulking.

Removing mold from grout:

Removing mold from grout is a little easier. All you need is an old tooth brush and bleach. If you want to try lemon juice and baking soda first before resorting to bleach, it might just work for you but sometimes, if the mold has been sitting there for a long time, bleach might be the only trick.
Just make sure to open a window and turn on a fan when cleaning. You won’t need to do this often but when you do, tackle it with all you got to get the job done quickly.


Monday, February 4, 2013

Easy Home Maintenance Tips for the New Year

OUTDOOR HOME IMPROVEMENT TIPS

Do you still have summer patio furniture on the patio, collecting snow? Did you ditch your home fix-it list as soon as the holiday season kicked in? Now that the busiest time of last year is over, start the new year by taking care of those home maintenance projects that shouldn't wait until the summer.


Store summer furnishings and outdoor equipment


Lisa Singer, product manager at Elmer's Products, based in Columbus, Ohio, says the opposite of spring-cleaning is "fall fix-it." However, if you missed the fall window to put away your summer furnishings and outdoor equipment, do it now. Consumers should "scour summer toys, furniture and outdoor equipment for wear and tear before packing them away for the winter," Singer suggests. "This will help avoid additional damage that can happen in storage and save you time and hassle come spring."


Check home and outdoor items for damage


As you pack away summer toys and outdoor furniture, here are a few things to look for. "Conduct a quick inspection to make sure all sections are intact, screws and nuts are still tight and there are minimal signs of wear," says Singer. "Look for cracks, tears or scrapes that can become worse during storage or create sharp edges."


Keep outdoor items organized


Isn't it the pits when spring arrives and you pull out your patio furniture, only to find that the hardware needed to put your furniture together is MIA? Singer recommends you not only check to see if you have all the pieces, you also organize them. "For toys with small parts or furniture that gets taken apart for storage, consider using plastic bags, bins, old glass or plastic food containers so these pieces don't get lost or separated during the winter," she adds.


Empower yourself by making small repairs


Now that you've inspected and put aside broken outdoor items, the next step is to assess the scope of the repair. Common repairs include squeaky or loose joints, cracks or missing pieces. Sure, you can throw away broken items, but according to Singer, for small to medium repairs, the solution can be as easy as tightening screws or using a bottle of multi-purpose glue.

"The Internet can be a great source for tips and advice because you can look up how-to instructions or find electronic user manuals," explains Singer. "Elmer's [of Elmer's Glue fame] has posted a variety of how-to videos at www.elmers.com/about/video-library." And before tackling any repair project, be sure to read the instructions and wear the appropriate safety equipment.


Safety tip: Discard outdoor items broken beyond repair


If you find outdoor furnishings, equipment and toys that are broken and can't be repaired, discard them to keep you and your family safe from injury. Before putting them in the trash can, check to see if the materials can be recycled, suggests Singer — most types of glass, aluminum and plastic can be recycled. "However, it is always a good practice to check with your local recycling provider or check the bottom for the recycling emblem."

To find your nearest recycling center, visitwww.1800recycling.com.


Donate or sell unwanted outdoor goods


If the item is new or gently used and you've decided you no longer want or need it, look for ways to donate it before simply adding it to the trash pile. "Garage sales, sharing websites like Craigslist or auction sites like eBay are great for selling unwanted items," Singer says, "or consider donating the items to non-profit organizations like Goodwill or The Salvation Army."


Resource:  Sheknows.com, Michele Borboa, MS